

How To Remove Embedded Nails
How to Remove Stuck Nails: Hammer Tips
Updated: Jun. 30, 2022
Stubborn boom got you lot stumped? Try these tricks for pulling the toughest nails.
Larn to pull bent or errant nails quickly and efficiently with your hammer, a cat's paw, nippers, and a forest block, or cut them with a reciprocating saw. Y'all tin can remove them without dissentious surrounding materials.
Yous might as well similar: TBD
Technique i: Maximize your hammer power
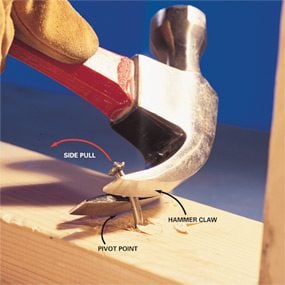
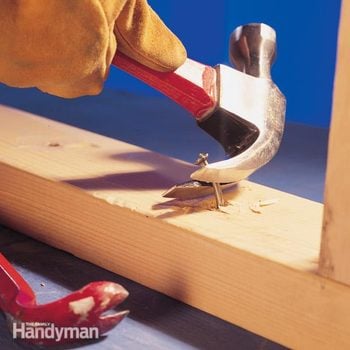
Photo 1: Side pull with hammer claw
Ram the claw of your hammer into the smash shank and rock it sideways using the claw edge every bit a pin point. Echo the process until you pry out the nail. This technique produces maximum pulling ability with niggling stress on the handle.
Back when I was a rookie garage-builder, the pb carpenter warned me that driving a nail nearly a knot is a waste of fourth dimension for three reasons: First, the nail will bend in the dense wood surrounding the knot before you lot tin can drive it home. Second, it'll be solidly wedged in the wood and tough to pull out. And third, you lot could suspension a hammer handle tugging at information technology.
I was stubborn and had to larn by experience. But I never broke a hammer handle, because I started out with an unbreakable all-steel model. By the time I graduated to a nicely balanced wooden-handled model, I'd learned how to pull nails quickly and efficiently enough to hardly break my nailing rhythm.
A hammer isn't the best nail-pulling tool, only since information technology'south already in your hand, use information technology. Ram the claw into the nail shank as close as possible to the wood and rock it sideways (Photo 1). Then repeat the process, pulling the nail most 1/2 in. each time. You lot develop terrific pulling ability, enough to extract fifty-fifty those tough cement-coated or galvanized nails, without straining your hammer handle or arm.
Because the hammer hook grabs the nail's shank, this method usually works fifty-fifty when the nail head has broken off. But it has a couple of drawbacks. The edge of the head volition seize with teeth into and dent the wood. If you don't want to mar the surface, slide a 1/iv-in.-thick piece of forest under the border before pulling. Also, a worn hook might slip on the shank and non deliver any pull. And finally, the pulling power can be and so bang-up that the nail shank might intermission earlier the nail lets go. At that point, either prune it flush to the wood with a side-cutting pliers and leave it, or saw through it (Photo 5).
Technique ii: Protect those finished surfaces with a block
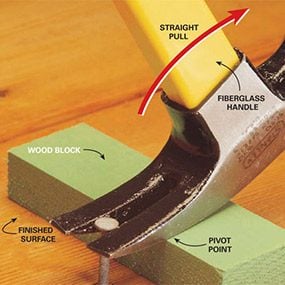
Photo 2: Apply a block to protect finished surfaces
Rest the hammer on a small block to protect finished surfaces. For a straight pull, size the block so the pin bespeak is every bit close to the nail every bit possible.
Shove a block of flake wood under the hammer head to protect delicate surfaces, like the cedar decking in Photograph 2. The block also gives the hammer hook improve leverage, so you tin can oft rock the hammer directly dorsum on its caput rather than sideways. But not always. Utilize this direct pull only on nails that come out fairly hands or aren't driven securely. Otherwise you could break a wooden-handled hammer. Although you lot can yank a lot harder on hammers with a fiberglass or steel handle, yous'll discover it's a lot easier to use a sideways pull.
Technique 3: Dig for cached nails
Photograph 3: Utilize a cat's paw
Drive the claw of a true cat's mitt nether the nailhead and lever it out. A cat's mitt tin even attain buried nailheads.
Buried nails are no friction match for a cat's paw, an essential tool to carry for all rough framing work. Emphasize "crude," because you lot drive the claw under the buried nailhead and rock the handle back firmly (Photo 3). The short claw develops tremendous leverage and will pull almost any nail. A strong, steady pull works best. If you jerk the handle, you could pop the caput off the blast, especially with 16d galvanized nails. You tin can use information technology for bent nails too. But you have to put a block nether the cat's mitt to develop good leverage, equally in Photograph ii, or slide your hammer head under it to shim it up.
Drawback: Even with a deft bear upon, the cat'southward paw digs upwards a divot of forest around the nailhead and leaves a distinct "paw print" backside when yous stone information technology back. It'southward not a stop tool.
Technique 4: Drive it through
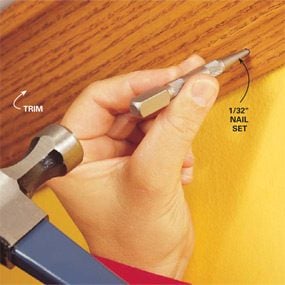
Photo four: Bulldoze information technology through
Dial cease nails all the fashion through with a nail set or pin punch so you don't have to pull them. This technique works best on finish trim that's less than 5/8 in. thick.
Finish carpentry sometimes calls for more refined tactics to avoid ruining a valuable slice of woodwork. You can pull most bent finish nails with the hammer-and- block technique shown before or with pliers.
But if you can't pry trim off without dissentious it, drive the finish nails completely through the trim (Photo 4) and popular it off. You can use either a 1/32-in. nail set or a 1/16-in. pin dial (buy at domicile centers and hardware stores). They are especially handy for releasing window and door casings that have been cantankerous-nailed to concord the miters together.
Drawbacks: Use the smash set for thin woodwork. Otherwise, you'll go out a adequately large round pigsty on the front side to fill later. And piece of work carefully near ends, because the smash prepare can carve up the woods.
Technique 5: Cutting the tough ones
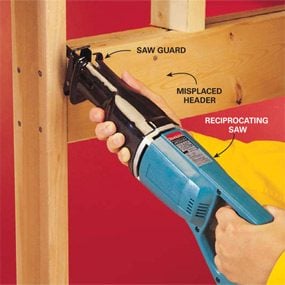
Photo v: Cut hard-to-attain nails
For maximum speed, cutting the nails with a reciprocating saw equipped with a 10-teeth-per- inch all-purpose blade. It'south ideal for rough work and demolition.
A reciprocating saw can cut through nails in a fraction of the fourth dimension it takes to pull them (Photo 5). Plus information technology'll achieve nails yous tin can't get at whatever other manner. Many all-purpose blades cut both wood and nails, but buy the 10-teeth-per-inch type because it cuts through hardened drywall screws every bit well. With a deft touch, you tin as well do delicate piece of work, like reaching behind trim to cut nails, likewise as screws and bolts, without marring the forest.
Drawback: Chances are that the bract volition pinch while cutting tight spots, and so push the saw baby-sit tightly against the wood and hold the saw firmly.
Technique 6: Pull them from the back

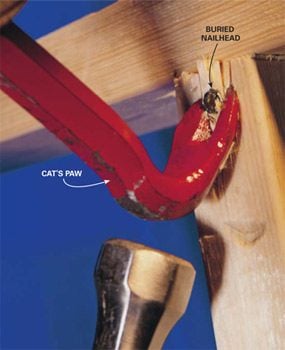
Photo six: Pull from the backside
Grab the finish blast on the dorsum side with nippers and lever the nail out. Its head will pull through with little harm to the wood.
Finish trim is expensive and worth salvaging whenever possible. If you can pry it off, pull the cease nails from the backside (Photo half dozen). They'll splinter the front if you bulldoze them back through. A nippers works well, simply and so do slip-articulation pliers and locking pliers.
Required Tools for this Projection
Have the necessary tools for this DIY project lined upward earlier y'all start—you lot'll salvage fourth dimension and frustration.
Originally Published: June 20, 2022

How To Remove Embedded Nails,
Source: https://www.familyhandyman.com/project/how-to-remove-stuck-nails-hammer-tips/
Posted by: speartherteplied.blogspot.com
0 Response to "How To Remove Embedded Nails"
Post a Comment